
| 일 | 월 | 화 | 수 | 목 | 금 | 토 |
|---|---|---|---|---|---|---|
| 1 | ||||||
| 2 | 3 | 4 | 5 | 6 | 7 | 8 |
| 9 | 10 | 11 | 12 | 13 | 14 | 15 |
| 16 | 17 | 18 | 19 | 20 | 21 | 22 |
| 23 | 24 | 25 | 26 | 27 | 28 | 29 |
| 30 |
- 조성남
- PHP4
- PID4
- sftp
- utf8mb4
- ubunto #네티워크설정
- root직접로그인
- CenOS6.10
- 한글2 #hangul2_from_2024_01_17
- ftp
- MSSQL #TCP/IP Enabled
- 신바람여비서win98
- centos7
- php7
- putty
- CapsLock키보드 뽑기
- 인터넷안되는문제해결
- 아이티제어
- 에디트플러스 #sftp안될때
- IT제어
- 윈도우앱지우기
- windows19Server
- 코드라마 #AI
- winscp
- Today
- Total
아이티제어
최저가ioT스위치제작방법 본문
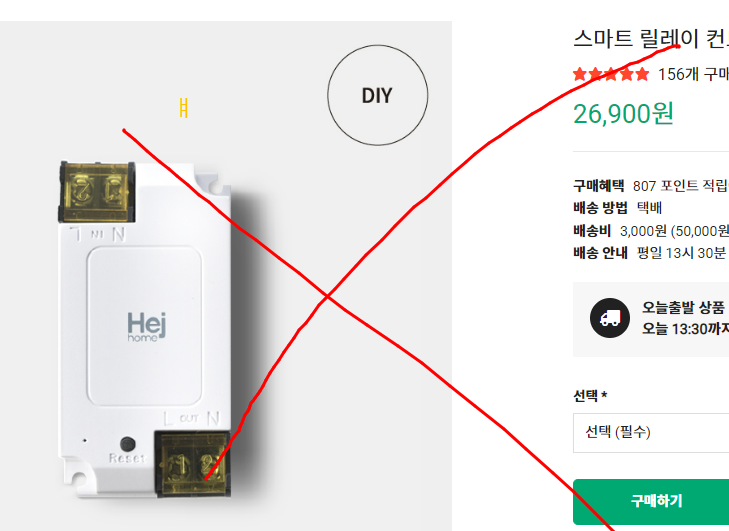
1개당 3천원도 안되는 가격!! 2300원 정도.
최저가ioT스위치제작방법을 시작합니다.
쿠팡 스 마트릴레이를 3만원대로 구매해서 의정부에 처제가 운영하는 학원의 전등을 끄고 켜고 자동으로 설정한
적이 있다.

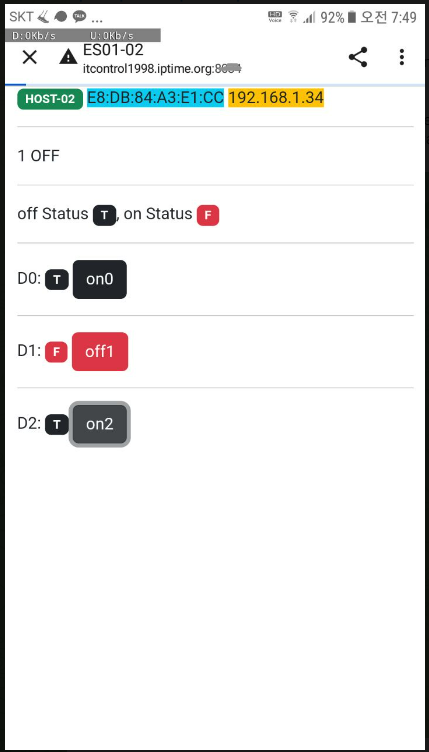
모바일 실행화면
필요지식 1/3 : iptime 공유기 포트포워드 방법
( 공유기에 글로벌 아이피와 사설아이피 192.168.1.34의 아이피에 특정 트를 포워딩하여 . 인터넷이 어느곳에서든 스위치를 끄고 켜고 할수있게.)
필요지식2/3 : iptime 공유기 DDNS설정법
(내 공유기의 유동 아이피를 내가 지정한 도메인 yourID.iptime.org 으로 서비스받음)
호출은 http://yourID.iptime.org:8088/on1 80으로 포트를 포워딩했다면 yourID.iptime.org/on1 하면됩니다.
on0, on1, on2 와 off0, off1, off2 가있는데요 1 은 on,off가 내부적으로 없고 i00번이 내부 led이고 i02가 외부 릴레이더군요.
필요지식3/3 : 아두이노IDE 이용하여 ES8266 에 아래에 제공된 프로그램 붙여넣고 다운로드 하는방법.

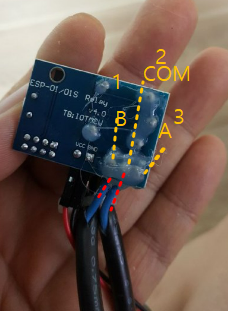
ESP8266 칩에 가까운 쪽부터 1,2,3이라고 하면 2번이 컴(공통)이고 , 1번이 상시 컴과 연결되어있다가. 5v전원이 인가되면 컴과 3번이 연결됩니다.
기본설정은 전원이 오프상태에서 켜지도록 하려면 1번( B접점) ,2번에 한가닥을 잘라서 생긴 2개점접을 하나씩 연결하고(극성없음).
LED전원이 켜지면 열결이 되도록 하고 싶으면 2번 3번(A접점)에 잘라진 2가닥을 각각 연결하면 됩니다.

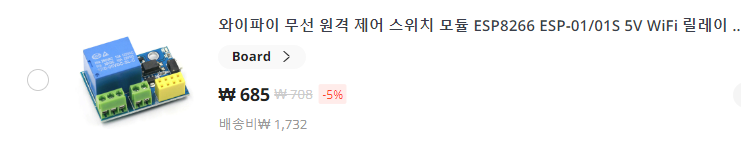
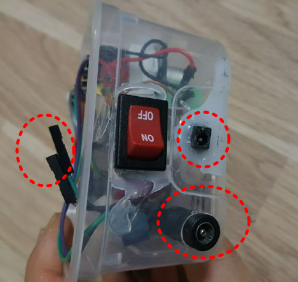
필요부품 1 ) ESP-01 모듈 1개
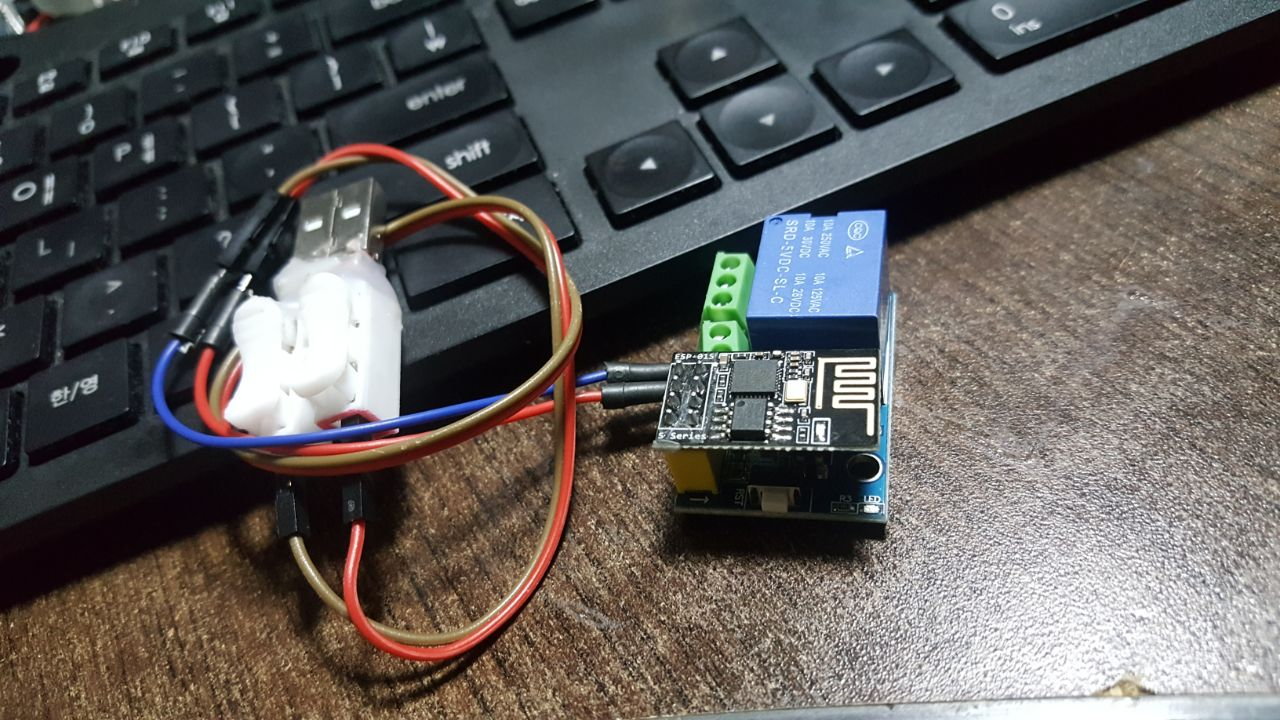
부품2) 다운로드 전용 usb부품
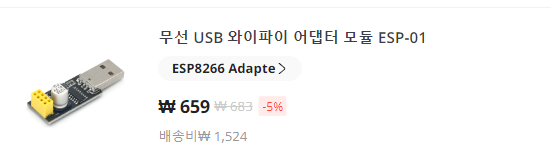
혹은 uart to RS232 모듈 + 버튼 + 3.3v + 케이블

테스트해본것.
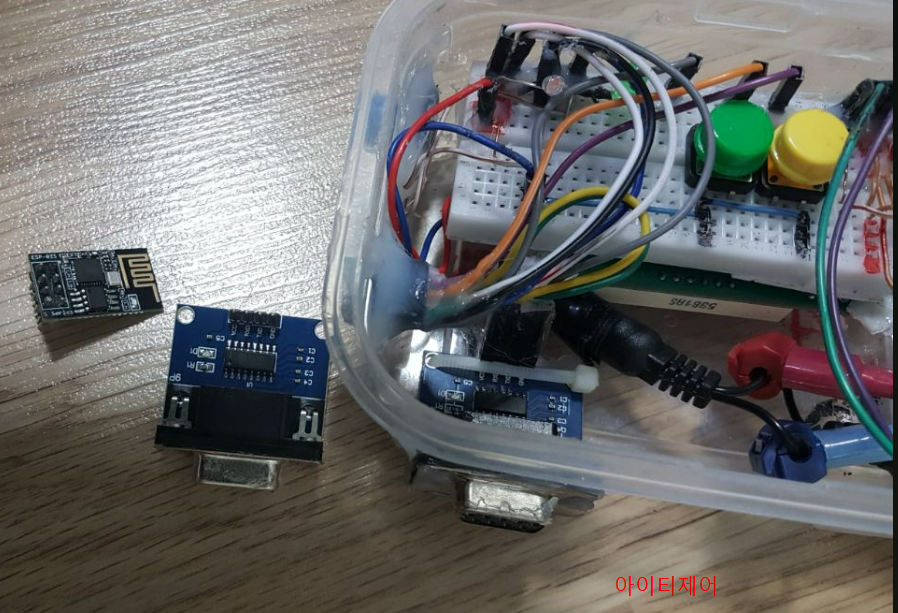
아두이노IDE로 스케치 프로그램을 작성하고 , 다운로드시에는 i00 + GND 를 서로 연하고 Power를 인가한다음 약 1초뒤에 버튼을 놓으면 다운로드 모드로 진입이되어 다운로드가 시작됩니니다.

ESP8266 ES-01모듈은 3.3V , TX, RX, GND , EN, i02, i00 이렇게 있습니다.
3v3V에 3.3v +극 연결, GND에 -극연결
PC USB는 5v
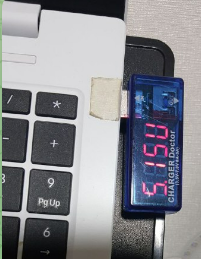
이기때문에 별도 3.3v전원혹은 건전지2개연결한것으로 혹은 USB에 2K정도의 저항을 써서 연결하면 되겠습니다.
제일 좋은 방법은 저처럼 Dc-Dc 컨버터를 써서 3.3v고정합니다.


EN은 인에이블 최초 한번 G하면되구요.
다운로드후 껏다가 켜든가. , RST버튼을 눌러주면 프로그램이 동작합니다.

알리에서 배송비 포함 2천원도 안가는 요것만 있으면 굳이 복잡하게 저처럼 DC-DC와 TTLto232를 쓸필요가없겠죠.
저는 2주 기다리기도 그렇고.. 쿠팡에서 1만3천원 사기도 그렇고.하여. 그냥 800원짜리 TTLto232 를 3개 구매하여 위와같이 자작하였어요.
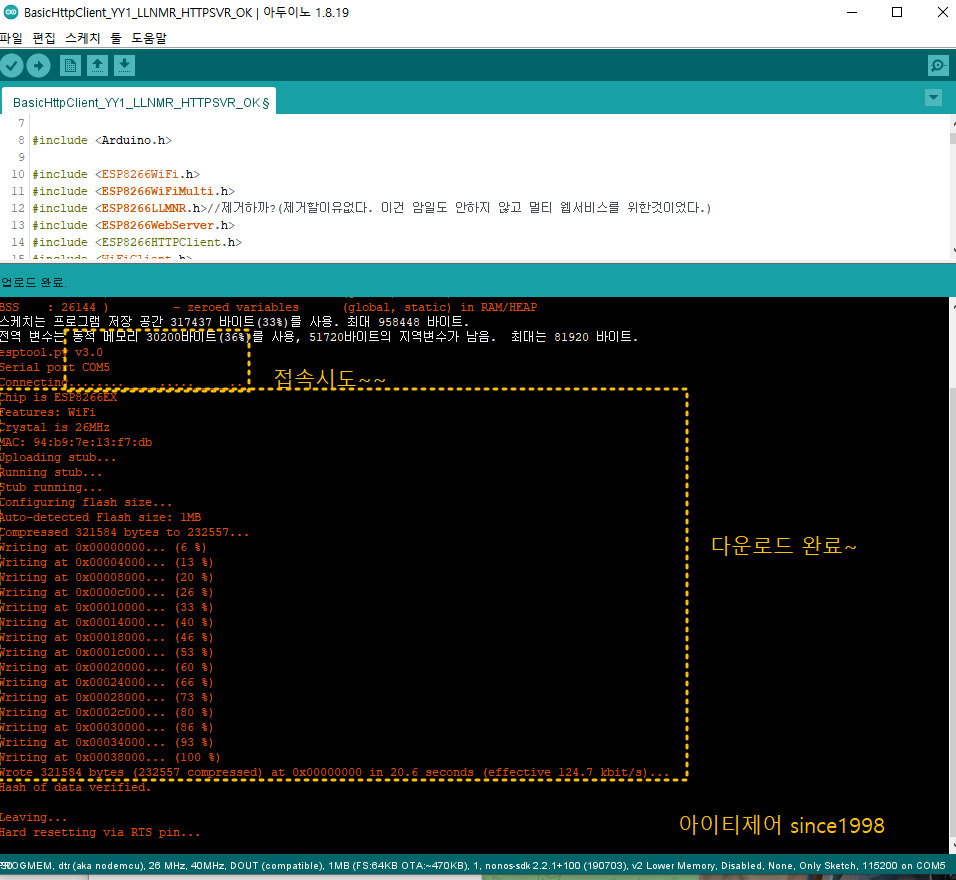
위에 자작한것으로 컴파일 완료모습.. 모든 소스는 여기 올렸습니다.
콘센트에 선풍기, TV 아무거나 연결할수있게.. 무엇이든지.연결하고. 폰에서 끄고 켤수있게됩니다.
이제 아두이노 프로그램을 해봅시다.
0단계:
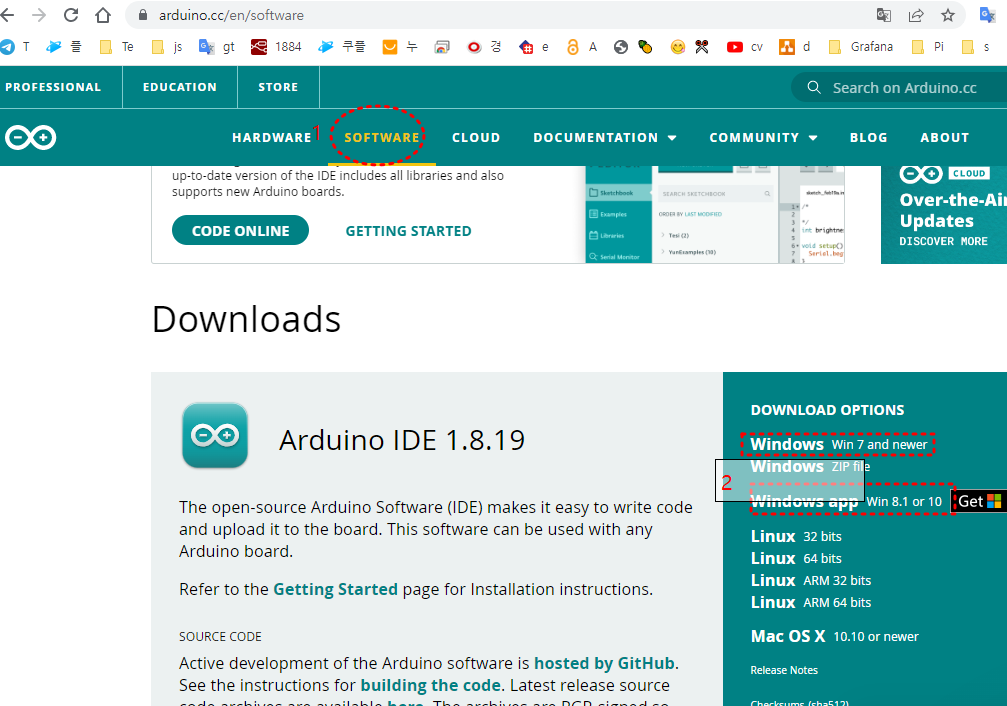
https://www.arduino.cc/ 를 열어 아두이노IDE를 다운받아 설치하고
IDE실행

파일>환경설정>추가적인 보드 매니저 URLs
https://dl.espressif.com/dl/package_esp32_index.json
https://arduino.esp8266.com/stable/package_esp8266com_index.json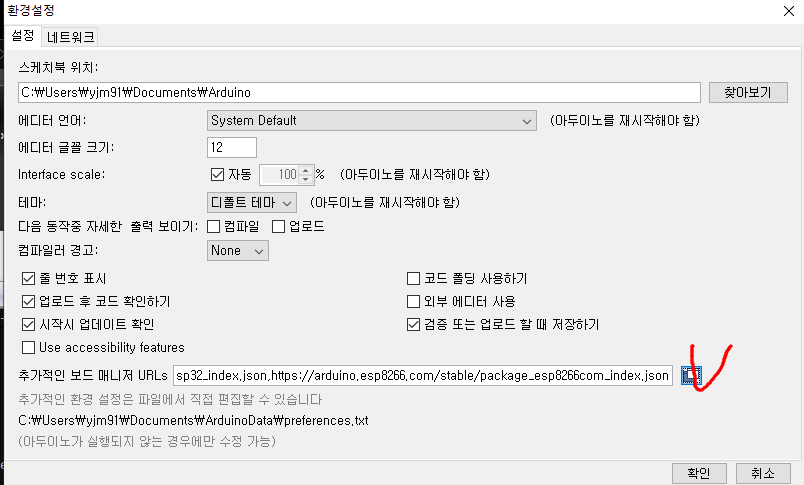
1단완료.
1단계: 툴 > 보드: > "보드메니져"
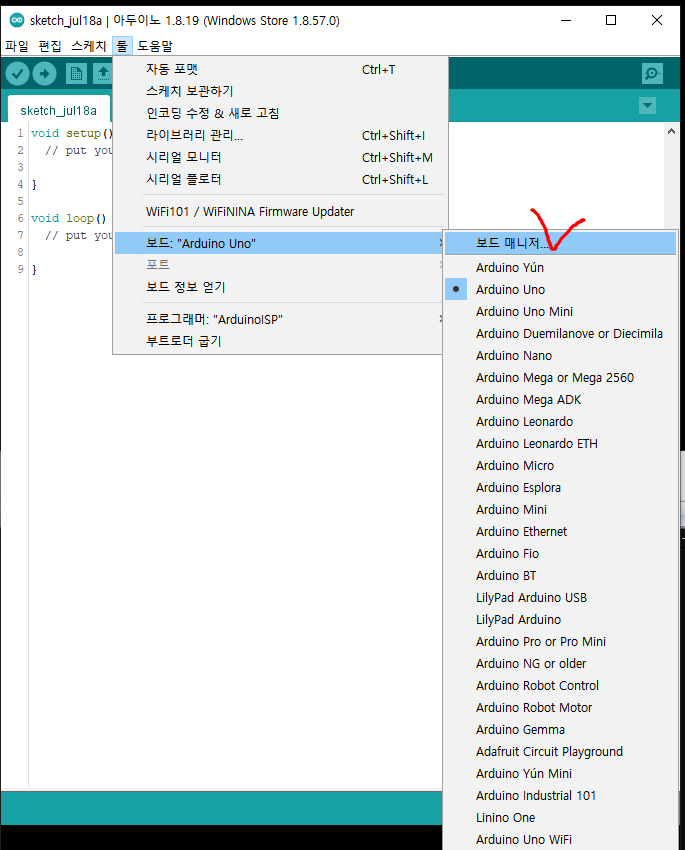
esp 검색하고 esp32 하고 esp8266 설치한다.
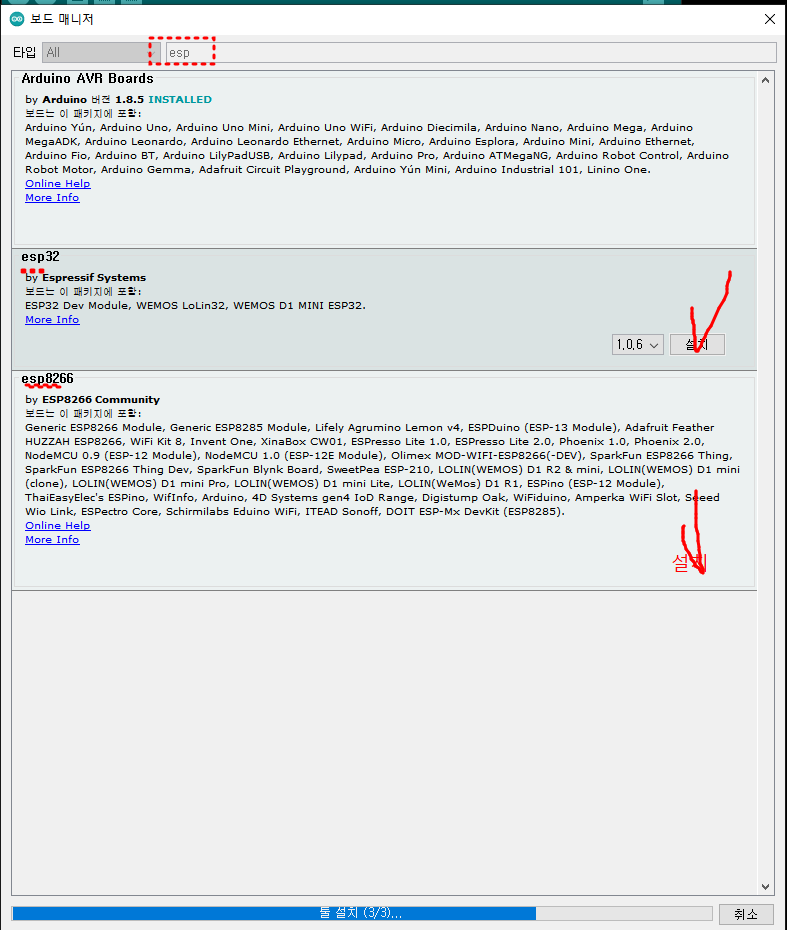
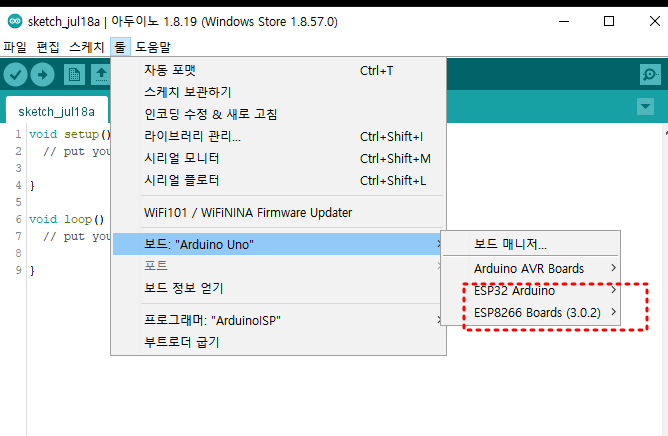
설치결과.
이제 아래소스를 복사 붙여넣기 아두이노IDE에 넣는다.
그리고 컴파일 > 다운로드 한다.
수정할것1는 : your_ssid 와 your_password 를 당신의 와이파이 아이디 암호로 수정한다.
아래소스는 아두이노 BasicHttpClient_YY1_LLNMR_HTTPSVR_OK.ino 파일이며, 복사하여 아두이노 IDE에 붙여넣습니다.
/**
 HTTPServer
 ESP8266
 */

#include <Arduino.h>

#include <ESP8266WiFi.h>
#include <ESP8266WiFiMulti.h>
#include <ESP8266LLMNR.h>//제거하까?(제거할이유없다. 이건 암일도 안하지 않고 멀티 웹서비스를 위한것이었다.)
#include <ESP8266WebServer.h>
#include <WiFiClient.h>


#ifndef STASSID
#define STASSID "your-ssid"
#define STAPSK  "your-password"
#define ES_O1_HOST  "02"
#define PORT80 80

#endif

ESP8266WiFiMulti WiFiMulti;
ESP8266WebServer web_server(PORT80);

const char* ssid     = STASSID;
const char* password = STAPSK;
String JS1 ="<link href='https://cdn.jsdelivr.net/npm/bootstrap@5.2/dist/css/bootstrap.min.css' rel='stylesheet'>";
String CSS1 ="<script src='https://cdn.jsdelivr.net/npm/bootstrap@5.2/dist/js/bootstrap.bundle.min.js'></script>";
String mac  = "";
String ip = "";

void handle_http_not_found() {
  web_server.send(404, "text/plain", "Not Found");
}
String CSSJS(){

  ip =  IpAddress2String(WiFi.localIP());

  String rt="<!DOCTYPE html><html lang='ko-KR'>";
  rt+="<head><title>ES01-" + String( ES_O1_HOST) + "</title>";
  rt+="<meta charset='utf-8'>";
  rt+="<meta name='viewport' content='width=device-width, initial-scale=1'>";
  rt+=CSS1 + JS1;
  rt+="<div class='container'>";
  rt+="<p><span class='badge bg-success'>HOST-";
  rt+= ES_O1_HOST;
  rt+="</span> ";
  rt+="<span class='bagde bg-info'>" + mac +"</span> ";
  rt+="<span class='bagde bg-warning'>" + ip +"</span> <hr>";
  return rt;
}
String readStatus012(){
  String rt="";
   rt = "<hr>ㅎoff Status <span class='badge bg-dark'>T</span>, on Status <span class='badge bg-danger'>F</span>";
   rt += "<hr> D0: " + ybString1( digitalRead(0),0) ;
   rt += "<hr> D1: "+ ybString1( digitalRead(1),1) ;
   rt += "<hr> D2: "+ ybString1( digitalRead(2),2) ;
   rt += "</div><!-- container --!>";
  return rt;
}

String readStatus012H(){
  String rt="";
   rt = "<br> D0:"+  ybString( digitalRead(0)) ;
   rt += "<br> D1:"+ ybString( digitalRead(1)) ;
   rt += "<br> D2:"+ ybString( digitalRead(2)) ;
  return rt;
}

String ybString(bool  v ){
  if(v) {
    return "T";
  }else{
    return "F";
  }
}
String ybString1(bool  v, int v012 ){
  String rt="";
  String ah="";
  String TF ="";
  String btColor="";
  if(v) {
    ah="on"+String(v012);
    TF="<span class='badge bg-dark'>T</span> ";
    btColor="dark";
  }else{
    ah="off"+String(v012);
    TF="<span class='badge bg-danger'>F</span> ";
    btColor="danger";
  }
  rt = TF + "<a href=/" + ah +" class='btn btn-"+btColor+"'>"+ah+"</a>";
  return rt;
}
void handle_http_root() {
  web_server.send(200, "text/html", "It works! "+readStatus012H());
}
void handle_http_on1() {
  digitalWrite(1, LOW);
  Serial.println("handle_http_on1");
  web_server.send(200, "text/html", CSSJS() + "1 ON "+readStatus012());

}
void handle_http_off1() {
  digitalWrite(1, HIGH);
  web_server.send(200, "text/html",CSSJS() + "1 OFF "+readStatus012());
  Serial.println("");
  Serial.println("handle_http_off1");
}

void handle_http_on2() {
  digitalWrite(2, LOW);
  web_server.send(200, "text/html",CSSJS()+ "2 ON "+readStatus012());
  Serial.println("");
  Serial.println("handle_http_on2");
}
void handle_http_off2() {
  digitalWrite(2, HIGH);
  web_server.send(200, "text/html", CSSJS()+"2 OFF "+readStatus012());
  Serial.println("");
  Serial.println("handle_http_off2");
}
void handle_http_on0() {
  digitalWrite(0, LOW);
  web_server.send(200, "text/html",CSSJS() + "ON0 "+readStatus012());
  Serial.println("");
  Serial.println("handle_http_on0");
}
void handle_http_off0() {
  digitalWrite(0, HIGH);
  web_server.send(200, "text/html",CSSJS()+ "OFF0 "+readStatus012());
  Serial.println("");
  Serial.println("handle_http_off0");
}

//
void BlinkCnt(int i) {
  //digitalWrite(2, LOW);
  delay(200);
  while ( i > 0 ) {
   digitalWrite(2, HIGH);  // Turn the LED on (Note that LOW is the voltage level
    // but actually the LED is on; this is because
    // it is active low on the ESP-01)
    delay(400);                      // Wait for a second
    digitalWrite(2,LOW);  // Turn the LED off by making the voltage HIGH
    delay(300);
    i--;
  }
}
String IpAddress2String(const IPAddress& ipAddress){
  return String(ipAddress[0]) + String(".") +\
  String(ipAddress[1]) + String(".") +\
  String(ipAddress[2]) + String(".") +\
  String(ipAddress[3])  ;
}
String mac2String(byte ar[]) {
  String s;
  for (byte i = 0; i < 6; ++i)
  {
    char buf[3];
    sprintf(buf, "%02X", ar[i]); // J-M-L: slight modification, added the 0 in the format for padding
    s += buf;
    if (i < 5) s += ':';
  }
  return s;
}


void yy_initWiFi() {

  Serial.printf("yy_initWiFi()");
  for (uint8_t t = 4; t > 0; t--) {
    Serial.printf("[SETUP] WAIT %d...\n", t);
    Serial.flush();
    delay(1000);
  }
  WiFi.mode(WIFI_STA);

  WiFiMulti.addAP(ssid, password);


  //while (WiFi.status() != WL_CONNECTED) {

  if ((WiFiMulti.run() == WL_CONNECTED)) {
    Serial.print(WiFiMulti.run());
    Serial.print(".");
    delay(500);
  }
  IPAddress  ip1 = WiFi.localIP();
  ip =  IpAddress2String(ip1);

  //uint8_t mac1 = WiFi.macAddress();
  //mac = mac2String( (byte*)mac1);
  mac = WiFi.macAddress();

  Serial.print("IP address ip: ");   Serial.println(ip+":"+PORT80 );
  Serial.print("MAC: ");    Serial.println( mac );
  Serial.println("연결돼따 (pin=2 4번깜빡)");
  BlinkCnt(4);
}
void setup() {

  pinMode(0, OUTPUT);
  pinMode(1, OUTPUT);
  pinMode(2, OUTPUT);

  Serial.begin(115200);
  // Serial.setDebugOutput(true);
  Serial.println();
  Serial.println();
  Serial.println();

  yy_initWiFi();
  HttpClient1();
  WebServerInit();
}
void WebServerInit(){
  // Start LLMNR responder
  LLMNR.begin("esp8266");
  Serial.println("LLMNR responder started");
  // Start HTTP server
  web_server.onNotFound(handle_http_not_found);
  web_server.on("/", handle_http_root);
  web_server.on("/on0", handle_http_on0 );
  web_server.on("/on1", handle_http_on1 );
  web_server.on("/on2", handle_http_on2 );
  web_server.on("/off0", handle_http_off0);
  web_server.on("/off1", handle_http_off1);
  web_server.on("/off2", handle_http_off2);
  web_server.begin();
  Serial.println("");
  Serial.println("HTTP server started  " );
}

void loop() {
  // static int  i=0;
  if ((WiFiMulti.run() == WL_CONNECTED)) {
    /*i++;
    if(i >= 50 ){
      i=0;
      Serial.println("");
    }else{
      Serial.print("H");
    }*/
    web_server.handleClient();
    //delay(100);
  }else{
    Serial.println("");
    Serial.println("Closed Reconnect Wifi ");
    yy_initWiFi();

    //ESP8266 AP 모드가 활성화, 비활성화되거나 WiFi 또는 AP 구성이    변경된 경우 변경 후 LLMNR.notify_ap_change()를 호출합니다.
    LLMNR.notify_ap_change();
  }

}
위에소스를 arduinoES01_Tester.ino 파일등의 이름으로 저장하고 업로드 하면됩니다.
이상으로 개당 3만원 가는 스마트릴레이를 개당 3천원하는 스마트릴레이 만드는법이었습니다.
관심있는분은 댓글 남겨주세요~
아이티제어 2022.8.18
끝.
'사물인터넷IoT' 카테고리의 다른 글
| ioT무선 LTE사용시 통신사별apn (1) | 2025.08.20 |
|---|---|
| [광고] ESP32에서 485모듈 선택시 주의점 (0) | 2025.08.20 |
| microPython 을 이용하기 위한 준비 (0) | 2022.08.21 |

